Tutorial 0: Finding your way around CurvedLand

|
| Curved Space View
|
The blue circle at the center of the screen represents the curved space that
you are occupying. The space illustrated by the CurvedLand applet is space of
constant positive curvature; this is mathematically equivalent to the surface
of a sphere. For more information about this model, click
here.
For the purposes of analysis, we will always assume that
you are at the North Pole on the surface of a sphere. The default for the
applet is to show 90 degrees of the
surface of the sphere in either direction; this means that you would be able to
see all the way to
the equator from the North Pole. You can adjust this visible angle by
adjusting the slider labeled view size.
|
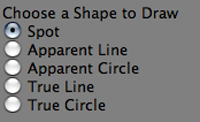
| Shape Selection
|
Adjusting the view size will not do much until you have something drawn in your space. You can draw shapes in the space by selecting a type of shape using the radio buttons at the left side of the applet, and clicking and dragging in the space. You will notice that there are two types of shapes: true shapes and apparent shapes. True shapes are shapes defined according to the geometrical definitions in curved space; true lines are lines that follow great circles, or the geodesics in this type of space (to learn more about geodesics, read
Tutorial 1), and true circles consist of all of the points equidistant
from a center point. Apparent shapes are shapes that appear to be
flat-space true shapes from your current perspective. The screen can be cleared
of all of the shapes by pressing the erase button, or by pressing the center
key on the numerical keypad when Num Lock is turned off.
|
| Navigation Buttons
|

|
| Navigation Controls
|
|
| Trail Controls
|
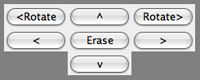
Once you have drawn shapes, you can move around in the space and watch how
those shapes start to distort from your perspective. To move, use the
navigation arrows in the upper right-hand corner of the applet. It is also
possible to move using the arrow keys on the keyboard, or the arrow keys on the
numerical keypad (usually found on the right side of PC keyboards for desktop
computers). In order to make the arrow keys on the numerical keypad work
properly, ensure that Num Lock is turned off. Notice that you can also
rotate using the buttons in the upper
corners of the navigation button panel; another way to achieve rotation is by
using the
upper corner keys on the keyboard's numerical keypad.
To control the size of the steps
you take each time you press a step button, adjust the step-size slider. You
can also control the angle that you rotate through each time you press the
rotate button by adjusting the rotation angle slider. In addition to this, the
total distance you have traveled will be displayed on the right-hand side of
the applet. You can reset this distance to 0 by pressing the reset button. You
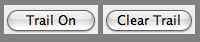
can also make a trail appear behind you showing where you have been; to do
this, click the trail on button in the top left-hand corner of the applet. Next
to this button is a clear trail button; this allows you to erase the trail
(clear it from memory).
General relativity states that space-time is curved, yet we experience
space-time as flat. When we draw a triangle, the angles add up to 180 degrees,
and when we draw a circle, the ratio between circumference and diameter is pi.
If we live in curved space-time, how can these things still be true? The key
here is that, on a local level, curved space-time (or space) can be
approximated by flat space-time; in other words, if you zoom in far enough,
curved space looks flat. Try exploring this in the applet: zoom in to the
smallest view size, and be sure to adjust the step-size slider as well so that
steps remain inside the same view. Try drawing shapes and watching how they
react as you move through the space. Compare this to how you expect shapes to
change as you move through flat space.
|
| Viewing 360 Degrees
|
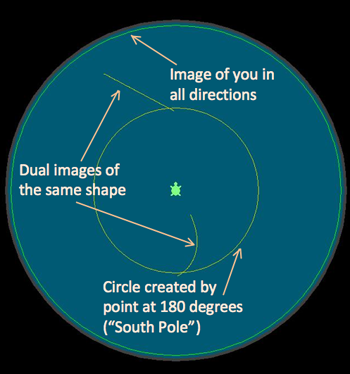
Next, try taking the view size to the other extreme. If you zoom all the way
out by adjusting the view size slider so it is at its maximum value, the
curvature of the space becomes very apparent (to move around, you may also
want to increase the step size). The view size value should now be 360 degrees;
this means that you can see 360 degrees around the sphere in either direction.
Essentially, what you see in this view is all the way around the sphere and
back to yourself. Turn the trail on; you should see a green circle that goes
all the way around the edge of the visible space. This green circle represents
you. If you were actually in this space, and you could see this far in every
direction, then you would just see yourself.
|
| Sight Lines on an Embedding Diagram
|
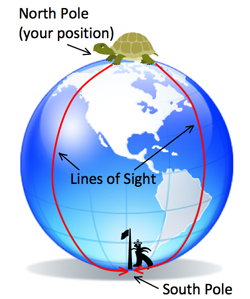
Think of yourself as being at the
North Pole; if you draw a shape
that crosses the South Pole then you will also see that shape in all
directions (represented as a yellow circle at 180 degrees from the center).
Draw some shapes in the space; each shape you draw should show up twice
(although the two versions may look different from one another). This is
because you will see each shape once before the South Pole, and once after the
South Pole; if you think about your sight lines as rays reaching outward from
the North Pole, those sight lines will first pass through all of the shapes
on their way down to the South Pole, and then they will pass through all of
the shapes again on their way back up to the North Pole (where you are).
To see this example in an even more extreme form, you can increase the maximum
view size allowed by the slider and increase your view size to see even more
of the space. To do this, click on the "Reset Maximum Zoom" button. Then
enter a new maximum zoom value; it might be useful to start with multiples of
180 degrees. If you enter 720 degrees, and you adjust the view size to 720
using the slider, how images of each shape will you see? At what angles will
you see yourself? At what angles will you see a spot at the South Pole? What if
you increase your maximum view size to 1440 degrees?
A summary of the controls mentioned in this document is
here.
You can also display this summary inside the applet by clicking and dragging
the bar at the bottom to expand it.
Copyright (C) 2010 Stephanie Erickson, Gary Felder
Terms and Conditions of Use